Introduction
A while ago I got an email from a Recipe Folder user asking how to get the Google Home integration working with Recipe Folder. I have no idea why they thought that there was an integration, but it got me thinking, maybe I should add one. I hadn't looked at Google Home or Amazon Alexa development before, but I thought it might be fun to add at least Google Home integration (I own a Google Home but not an Alexa yet) to Recipe Folder. So I responded to the user saying that there was currently no integration but it was something that I was going to look into.
So I started looking into writing a Google Home app. A bit of research, and I discovered that you don't really write
Google Home app's, but you write Google Actions that run on any of the Google Assistants (the Google Home being one,
but also there is an assistant built into all modern Android Phones and Tablets and Google has licensed the Assistant to
multiple companies so they can create their own Google Assistants some of which are starting to show up now
lie the Zolo, TicHome Mini,
the Sony LF-S50G,
the JBL Link 10, and
soon to be many others). Most of the tutorials that I
discovered were built around api.ai which is now called dialogflow, and used Google
Cloud platform to run. I needed access to all the data on my own servers, so I wanted to write a stand-alone that didn't
require outside services (other than the Google Action API, obviously). While there were some example apps from
Google in the Actions of Google Github Page, these mostly seemed to be using
Firebase or Google cloud, so I figured that someone should write a simple tutorial on how to get a Google Action
running on your own server from nothing. We are going to write a very simple game (in the next article) you can quickly play with your
Google Assistant, Rock, Paper, Scissors, Lizard, Spock, in the third
article in the series we are going keep track of your winnings and losings over time so we will required a login.
To this end we are going to include OAuth 2.0 and Account Linking,
so we can store those wins and losses (and because one of the larger hassles I had writing my integration was implementing the OAuth 2 integration).
Intended Audience
Although anyone who has some experience with command line tooling and programming should be able to follow this article, it assumes that you have some familiarity with NodeJS, JavaScript, and you will need a Google Account. Having a Google Home for testing is nice, but is not required as you can test your app on either your Phone or the Simulator. If you are unfamiliar with modern JavaScript (ES6 or ES2015), I will explain some of the new features as we go along. For now just know that const is a var that cannot be changed after being initialized (if you want to read it as var, go ahead), and other things will be explained as we run into them. Although this looks like a fairly long article (and that is the reason it is broken into 3 parts), getting your first application up and running should take under half an hour if everything goes right.
Required Tooling
We are going to do this in nodejs, using the Action on Google Node Client Library, ngrok.io to provide a tunnel from the open web, to our application. In the end, we will us MongoDb to store that user login and the score from the games. The web server that servers both the JSON, and the login web pages is going to be Express, and we will be using modern Javascript so you will need NodeJS at least 8 installed. The more OAuth and Mongo is coming in a later installment, so for now just make sure that you have the following installed:
- NodeJS LTS (8.9.4 at the time of writing this, but feel free to go with 9.5 which is the current).
- NGrok client and have that available on your path. You will need to sign up for a Free Account as well.
- GActions CLI and have that available on your path. You will need a Google Account, and if you have never used any Google API's or Cloud Services you may be required to click through some agreements.
I'm doing all of this on Windows, but it will certainly work on OSX or Linux. I'm also using WebStorm, but any editor can be used, however I recommend one like WebStorm or Visual Studio Code where you can debug in the same IDE that you are editing in but there are relatively clear instructions on how to get up and debugging on the NodeJS site.
Getting Started
Package.json
First thing we are going to do is make a package.json file.
{
    "name": "google-actions-rpsls",
    "description": "Rock Paper Scissors Lizard Spock as a Google Action",
    "version": "0.0.1",
    "dependencies": {
        "actions-on-google": "^1.7.0",
        "express": "^4.16.2",
        "body-parser": "^1.18.2",
        "ejs": "^2.5.7",
        "mongoose": "~4.13.6"
    },
    "scripts": {
        "start": "node index.js"
    }
}
First, lets download the dependencies, type:
npm install
Since there are no comments in JSON, let's go through the various dependencies.
Actions on Google
Actions-on-google is the library from Google that is going to allow us to quickly communicate with Google Actions without having to manually parse all the input from Google Action, and having to write all the JSON responses. It provides a fairly nice, and relatively well documented API.
Express
Although actions-on-google appears to be designed for the Google Cloud Platform Http Functions, according to documention, the Google Cloud Platform have the same properties as the ExpressJS Request and Response objects. Thus instead of installing the Google Cloud Platform simulator, or running on the Google Cloud Platform we can use ExpressJS instead.
Body Parser
In version 4 of Express, it was componentized. Body parser allow reading of the HTTP Posts and placing their contents in req.body, there are a lot of other enhancements and niceties (serve-favicon, compression, session handling, etc) that could be added to improve the app but we'll leave those as exercises for the user to keep the code as simple as possible. Note: The Actions on Google requires that body-parser be added as middleware to Express or it will not work.
Ejs
We are going to need a login page eventually, and I am using EJS as the templating engine, we won't need it until a couple of articles down the line (in the third article in the series), but lets set up the package.json now.
Mongoose
Eventually (once again, the third article of the series) we are going store our user accounts in Mongo, and Mongoose is nice ORM wrapper around Mongo.
RPSLS.json
Since our app is Rock Paper Lizard Spock we are going to use the acronym rpsls all over the place. The first place we are going to do that is for the project.json file for Google Actions (or gactions). Create a file rpsls.json and populate it with:
{
  "actions": [
    {
      "description": "RPSLS Welcome Intent",
      "name": "MAIN",
      "fulfillment": {
        "conversationName": "main"
      },
      "intent": {
        "name": "actions.intent.MAIN"
      }
    }
  ],
  "conversations": {
    "main": {
      "name": "main",
      "url": "https://CHANGE-ME.ngrok.io",
      "fulfillmentApiVersion": 2
    }
  }
}
Note the CHANGE-ME in the conversations, eventually when we get your NGROK connection setup, you will have to change that URL.
In the third article we are going to be adding to this file, to enable authentication, but for now this will do. This file is currently divided into 2 sections, actions and conversations and only describes one action. The actions described in ActionPackage are actions that are available without having started a conversation (we will code other Actions later, but they will not need to be described in the actions file since they are only available once a conversation is started). Each action must have a name (according to the documentation they do not have a an intent or description if the name of the intent is a built-in intent, for example action.intent.MAIN -- but I haven't tested that), and should have an intent, a fulfillment and a description. The fulfillment must have a field conversationName, and that has to point to a name in the conversations section.
The conversations section has a collection of conversations, which have a name, a url and fulfillmentApiVersion. Make sure the name of the conversation matches the collection name, and the fulfillmentApiVersion is set to 2 (Api 1 was very different, and will not be supported much longer and doesn't work with actions-on-google npm module).
Set Up A Project
Go to the "Actions on Google Console" by going to https://console.actions.google.com/.
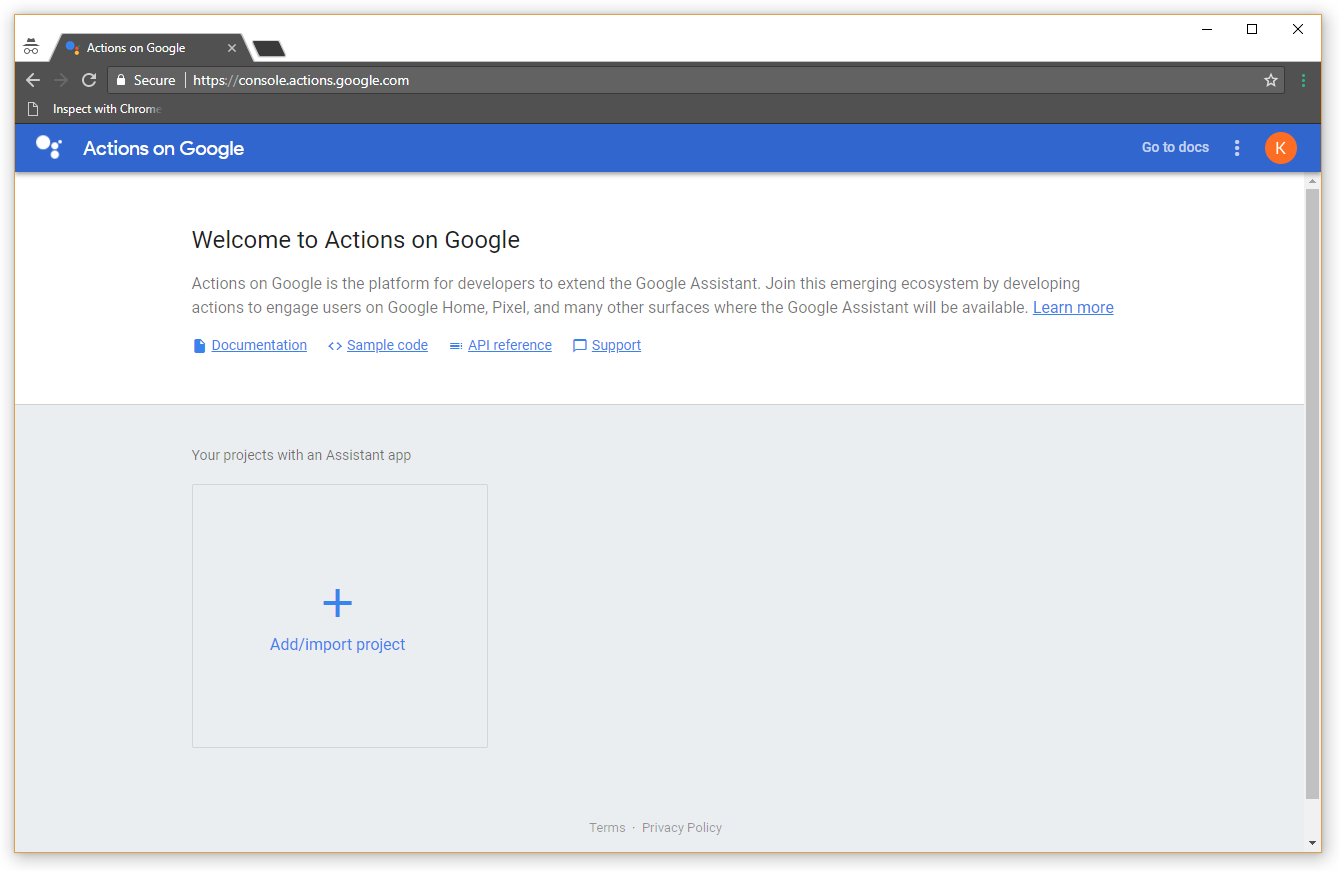
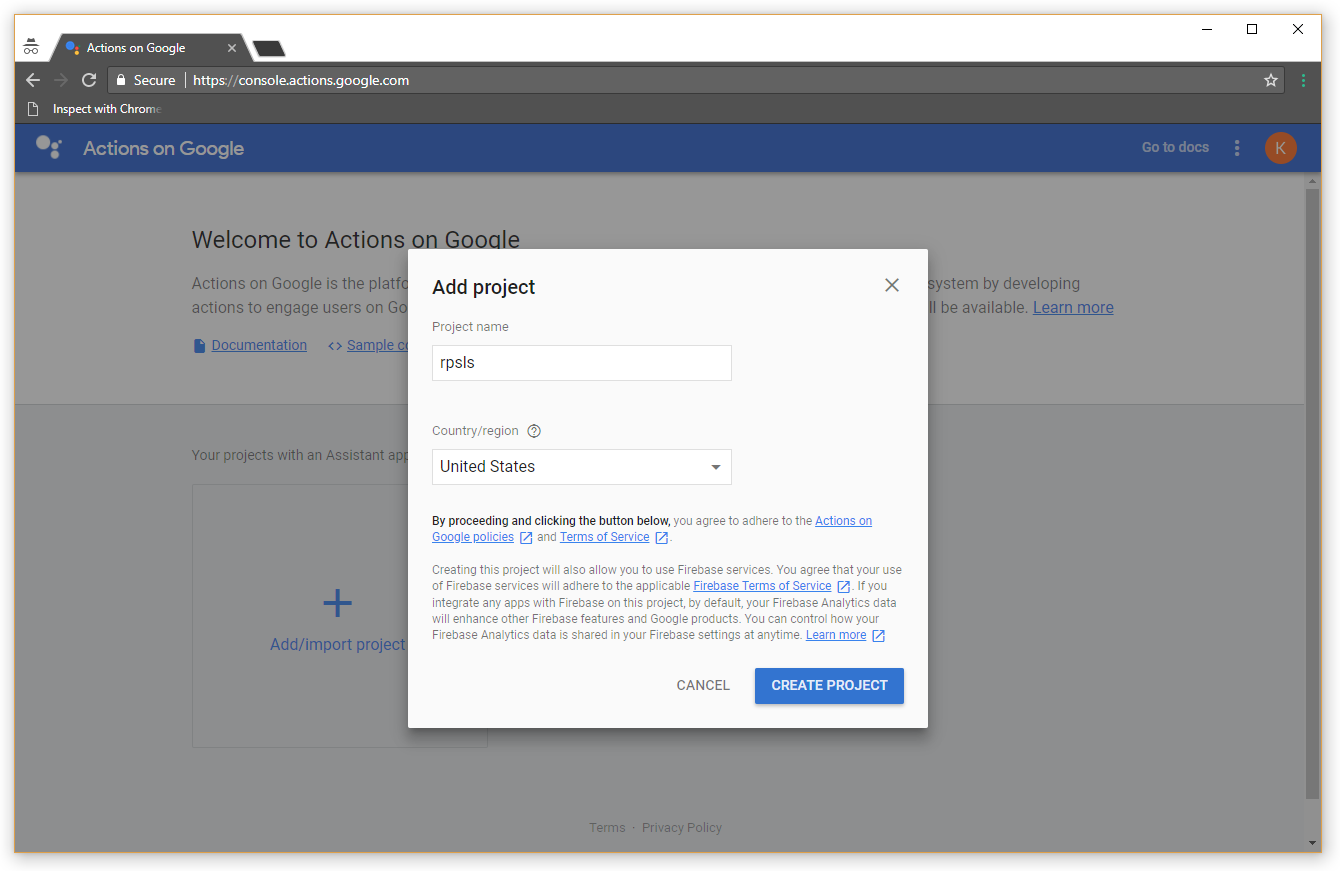
Click on Add/Import Project, and call it rpsls. Click on Create Project.
Now click on the "Actions SDK" build button:
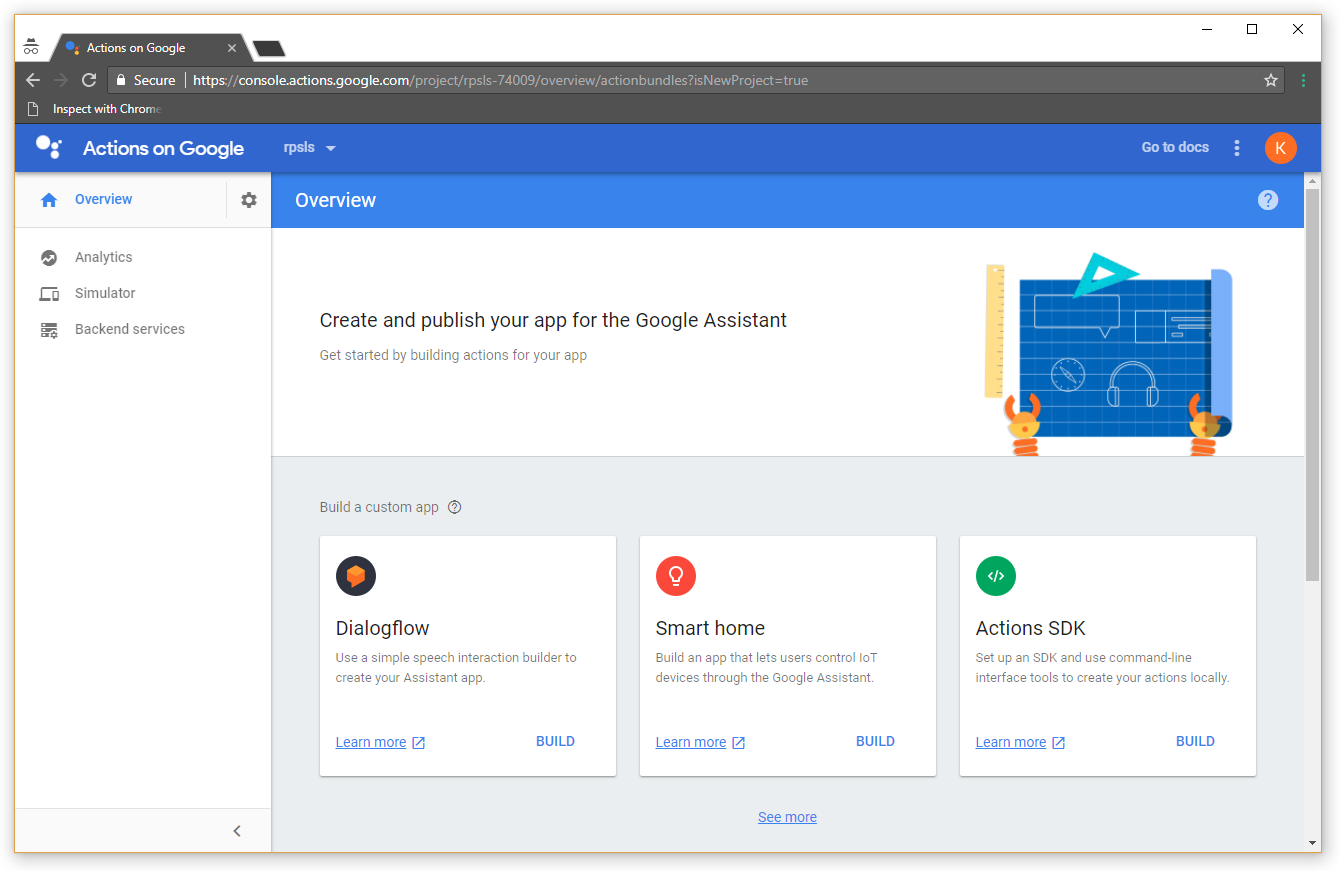
And you will see that your project has been created.
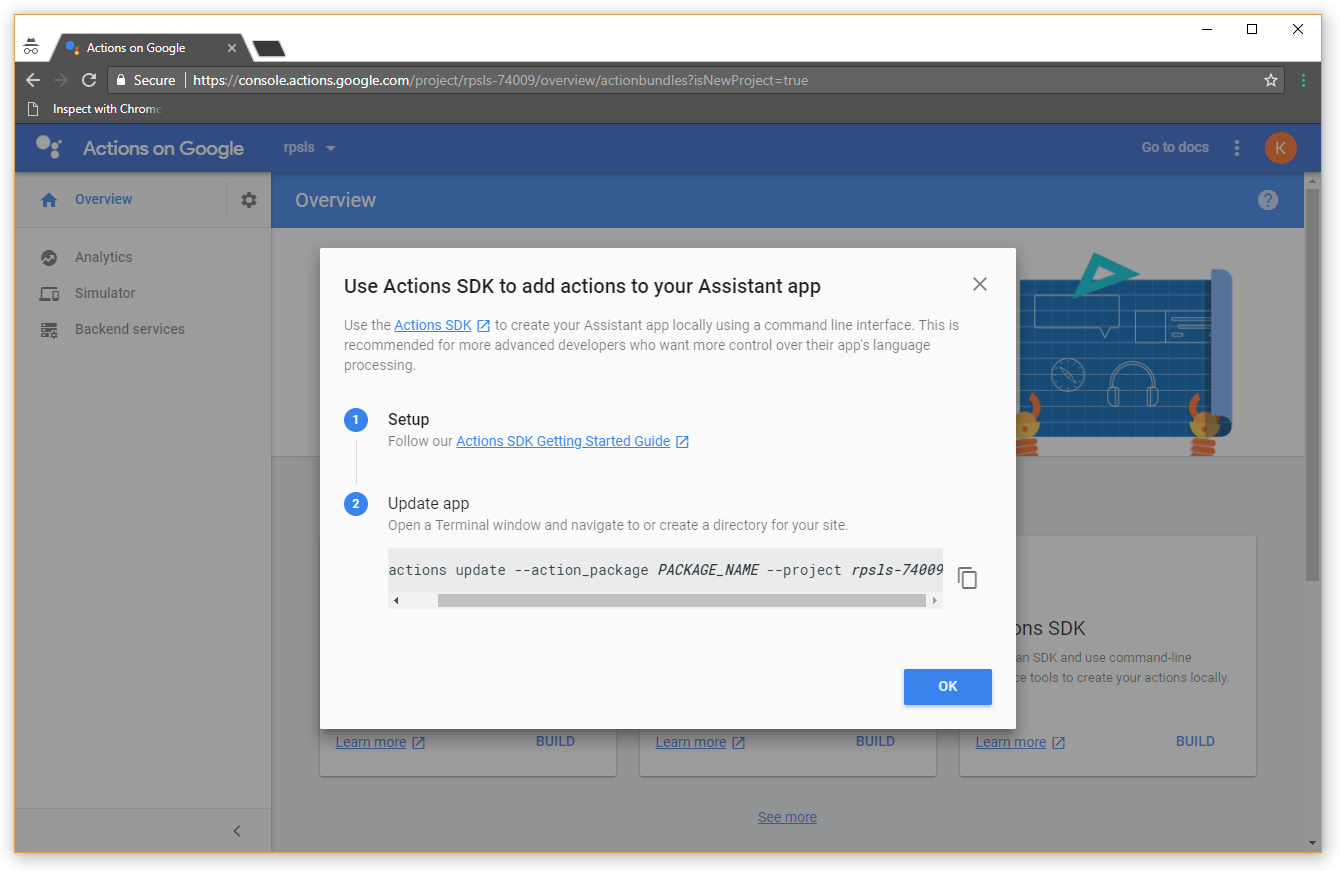
Now copy the piece of text from the second step and paste it into a command prompt where the active directory is the project root
(the directory where you created the rpsls.json and package.json) -- don't hit return yet. It should look something like:
gactions update --action_package PACKAGE_NAME --project rpsls-XXXXX
Where the XXXXX will be a unique number assigned to you by Google. Replace PACKAGE_NAME with rpsls.json and hit enter:
gactions update --action_package rpsls.json --project rpsls-XXXXX
If everything goes right, you will be told (did you forget to download and place the gactions CLI in your path, if so do that now.)
Gactions needs access to your Google account. Please copy & paste the URL below into a web browser and follow the instructions there. Then copy and paste the authorization code from the browser back here.
Visit this URL:
 https://accounts.google.com/o/oauth2/auth?access_type=offline&c.....
Once you have visited the URL paste the authorization code into the command prompt your app should be ready for testing. Except we don't have an app.
The First App
Create a new file index.js (of course you could call it app.js or google-actions.js or rpsls.js) in the root directory of our project.
const ActionsSdkApp = require('actions-on-google').ActionsSdkApp;
const express = require('express');
const bodyParser = require('body-parser');

const expressApp = express();

expressApp.use(bodyParser.urlencoded({extended: false}));
expressApp.use(bodyParser.json({extended: false}));

function mainIntentHandler(app) {
    app.ask('Hey Ma, It works!');
}

expressApp.use((request, response) => {
    console.log('Request body: ' + JSON.stringify(request.body));

    const actionApp = new ActionsSdkApp({
        request,
        response
    });

    // Map that contains the intents and respective handlers to be used by the
    // actions client library
    const actionMap = new Map();

    actionMap.set(actionApp.StandardIntents.MAIN, mainIntentHandler);

    actionApp.handleRequestAsync(actionMap).then(() => {
        console.log('Success handling GoogleAction request');
    }, (reason) => {
        console.error('Error: ' + JSON.stringify(reason));
    });
});


expressApp.listen(5050, () => console.log('Example app listening on port ' + 5050));
OK, the app is really simple at this point. The first bit of code just loads the libraries and sets up Express (if you don't understand that part of Node, Mozilla has great tutorial on getting started with Node). We set the main express middleware function to be our actions SDK handler.
We could also just make this a post handler like this:
expressApp.post('/', (request, response) => {Also if you are new to the whole ES6 thing, the lambda expression is the same as:
expressApp.post('/', function(request, response) {Now lets look at what we are doing in our Middleware function (post handler, whatever you want to call it). The log on the first line is just so you can see what Google Actions is sending us each time. It will look something like this:
Request body: {
    "user":{
        "userId":"ABwppHH...cTfKaFJo",
        "locale":"en-US",
        "lastSeen":"2018-02-04T17:32:26Z"},
        "conversation":{
            "conversationId":"1517765608314",
            "type":"NEW"
        },
        "inputs":[
            {
                "intent":"actions.intent.MAIN",
                "rawInputs":[
                    {
                        "inputType":"VOICE",
                        "query":"talk to my test app"
                    }
                ]
            }
        ],
        "surface":{
            "capabilities":[
                {
                    "name":"actions.capability.AUDIO_OUTPUT"
                },
                {
                    "name":"actions.capability.MEDIA_RESPONSE_AUDIO"
                }
            ]
        },
        "isInSandbox":true
    }
which you will see shortly when you get your App up and running.
Next we construct our actionsApp, there isn't any documentation for what you can send to the constructor, but from the source code we can see is that the only three things it takes is a request, response, and sessionStarted function. If you aren't 100% familiar with modern ES6 (ES2015) syntax, note that
const actionApp = new ActionsSdkApp({
    request,
    response
});
is just syntactic sugar for
const actionApp = new ActionsSdkApp({
    request: request,
    response: response
});
Next we create Map of actions to event handlers. And finally we handle the request based on the actionMap we created above. Note that there are two ways to handle the request, we could have also done the more succinct (and from what I have seen more common):
actionApp.handleRequest(actionMap);However, then you get no idea of what the error was when it happened, and usually just a not very useful unhandled promise request.
Finally we have our very simple mainIntent handler which just speaks to the user "Hey Ma, It Works". The ask function takes a lot of possible arguments, and has builders and we will get into the complexities of how it works in the next tutorial, but for now know that you can send it is simple string and the Google Assistant will read it. OK, now that we have a working script lets get this show on the road.
Tunneling with NGrok.io
Since we are keeping things simple, and not requiring a VPS or doing something sketchy with our firewall or setting up Dynamic DNS and since Google Actions wants to be on HTTPS, we are going to use ngrok to forward HTTPS from the internet to our app running on port 5050 on our PC. It is pretty self explanatory get setup with ngrok (follow the instructions on their site), and don't worry, for what we are doing it is completely free. Once ngrok is installed, you have signed up with an account, start up a tunnel by typing:
ngrok http 5050
It will look something like:
ngrok by @inconshreveable                                                                                                                                                                                                                             (Ctrl+C to quit)

Session Status                online
Account                       Kris Erickson (Plan: Free)
Version                       2.2.8
Region                        United States (us)
Web Interface                 http://127.0.0.1:4040
Forwarding                    http://dbbe2688.ngrok.io -> localhost:5050
Forwarding                    https://dbbe2688.ngrok.io -> localhost:5050

Connections                   ttl     opn     rt1     rt5     p50     p90
                              7       0       0.00    0.00    8.42    20.98
Copy the https url (in this case https://dbbe2688.ngrok.io) and paste it into your rpsls.json converstation url:
"conversations": {
    "main": {
      "name": "main",
      "url": "https://dbbe2688.ngrok.io",  ⇐ CHANGE THIS LINE
      "fulfillmentApiVersion": 2
    }
  }
Now we have to tell Google Actions that we have change our url, so go back to the command line and type (where rpsls-XXXXX is the same project name you received earlier)
gactions update --action_package rpsls.json --project rpsls-XXXXX
Wow, finally we are ready for testing!
Finally, testing the app
We need to start the app up and running, which is as simple as
node index.js
Eventually you might want to debug the app, either in WebStorm, Visual Studio Code or the Node Inspector, but be aware that you only get less than half a minute before the request times out and Google Assistant tells you that "my test app is not responding".
Hopefully if all went right, the app is up and running.
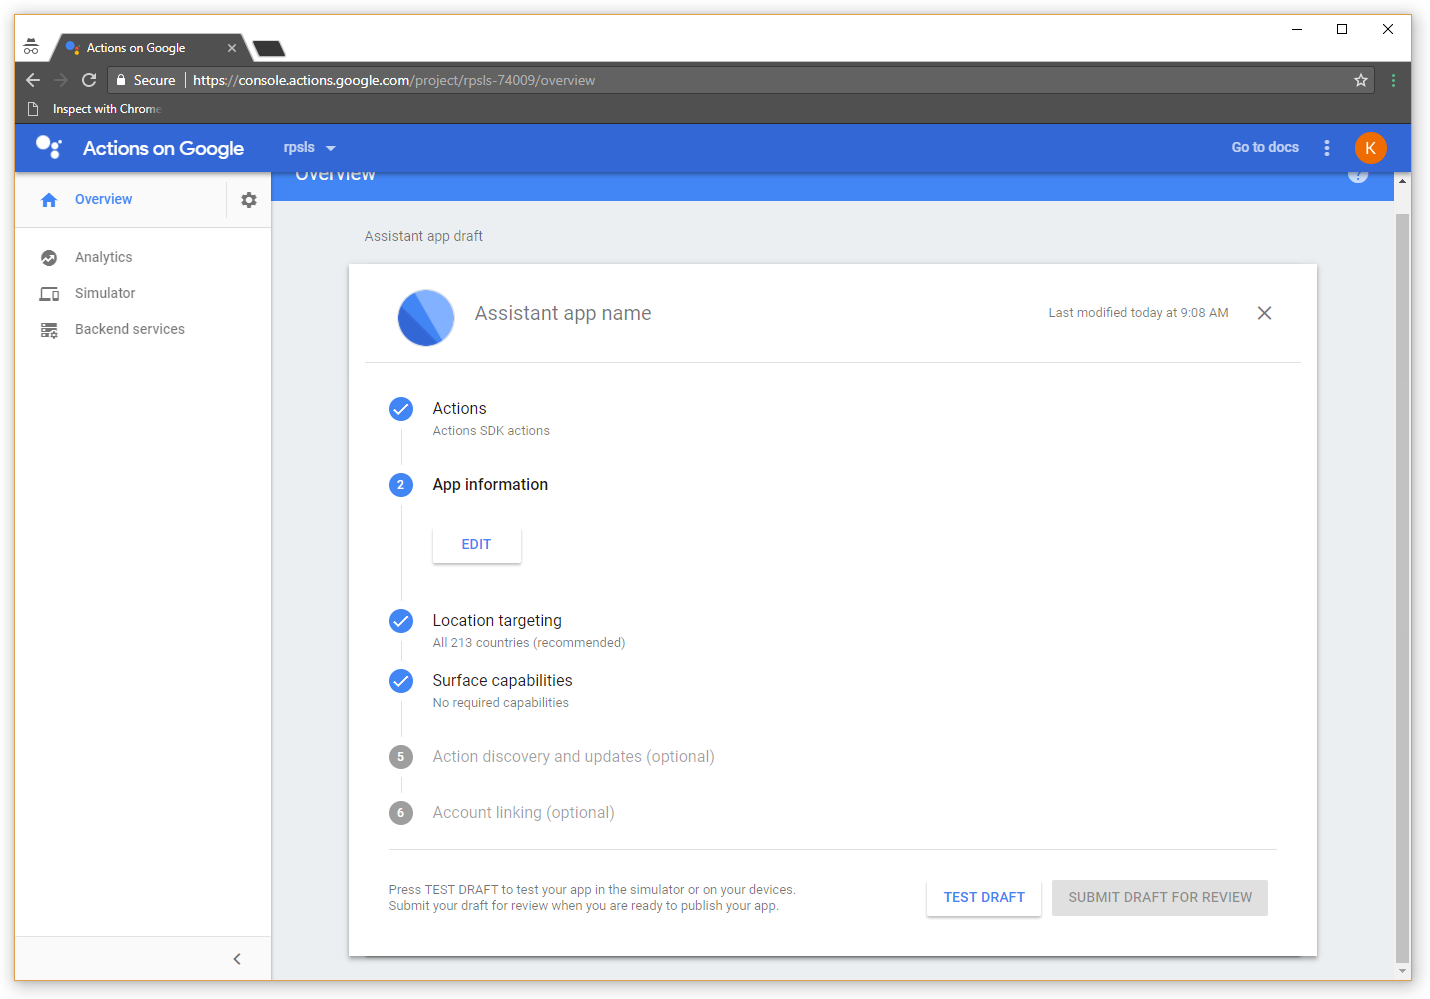
We want to go to our Google Actions console, https://console.actions.google.com/ and pick our rpsls project. In the Overview section hit "Test Draft".
We haven't set up the "App Information" on purpose, so our App will be called "My Test App". Feel free to set this up, you will need a unique name for the app, as well as graphics, a description, a url for your privacy policy, etc. In the third article in this series we will come back here to set up account linking, but for now we can just hit "Test Draft".
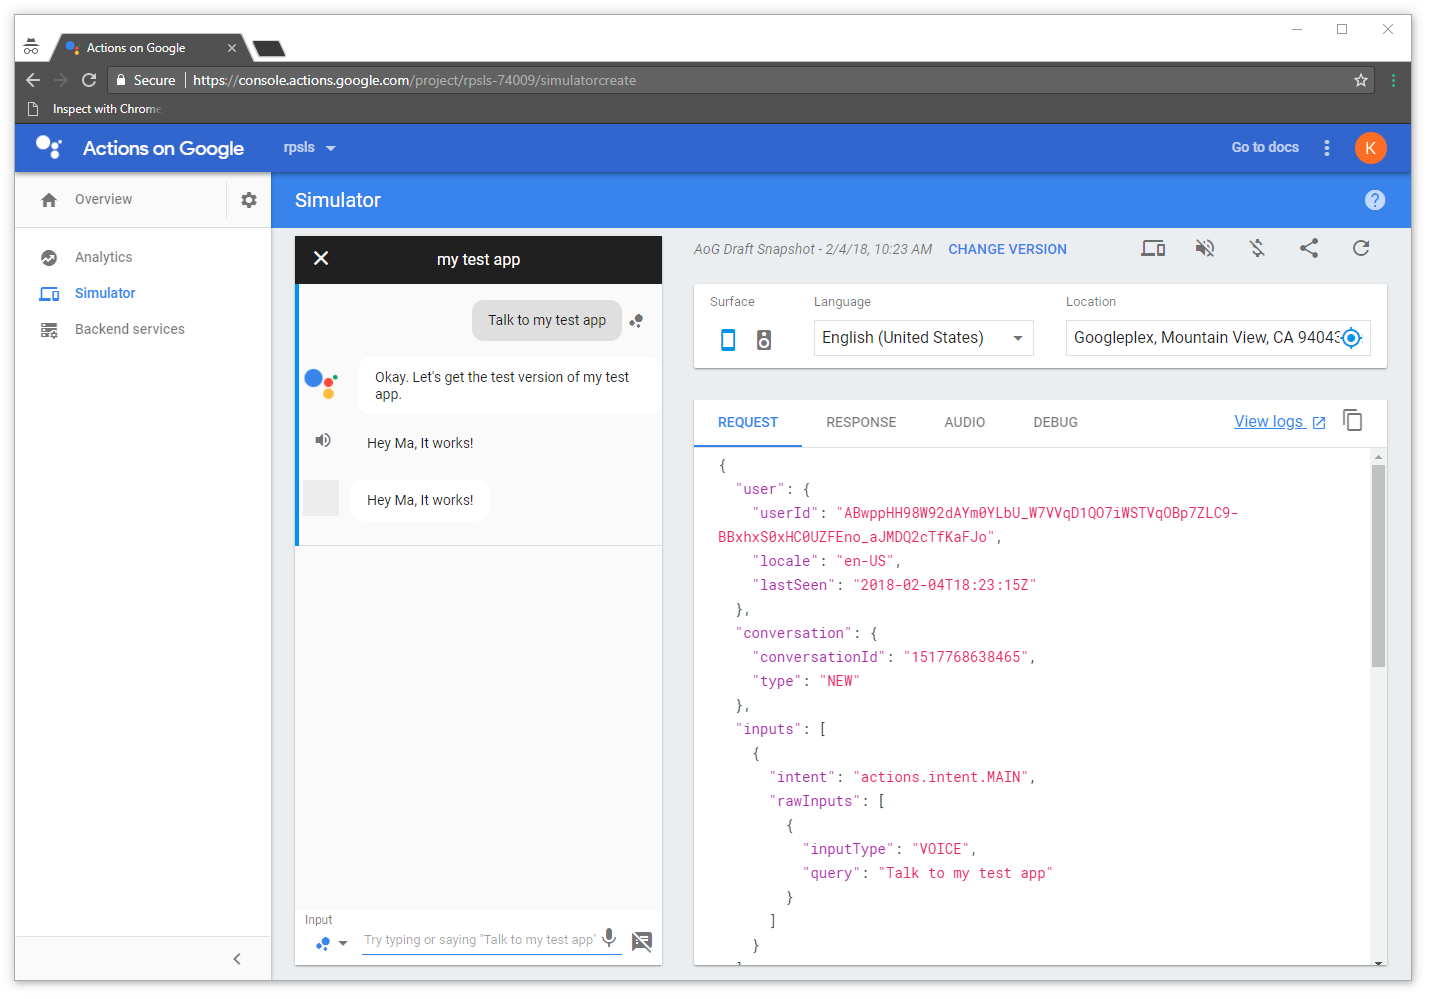
You should see the simulator in all it's Glory. In the input section type
"Talk to my test app"
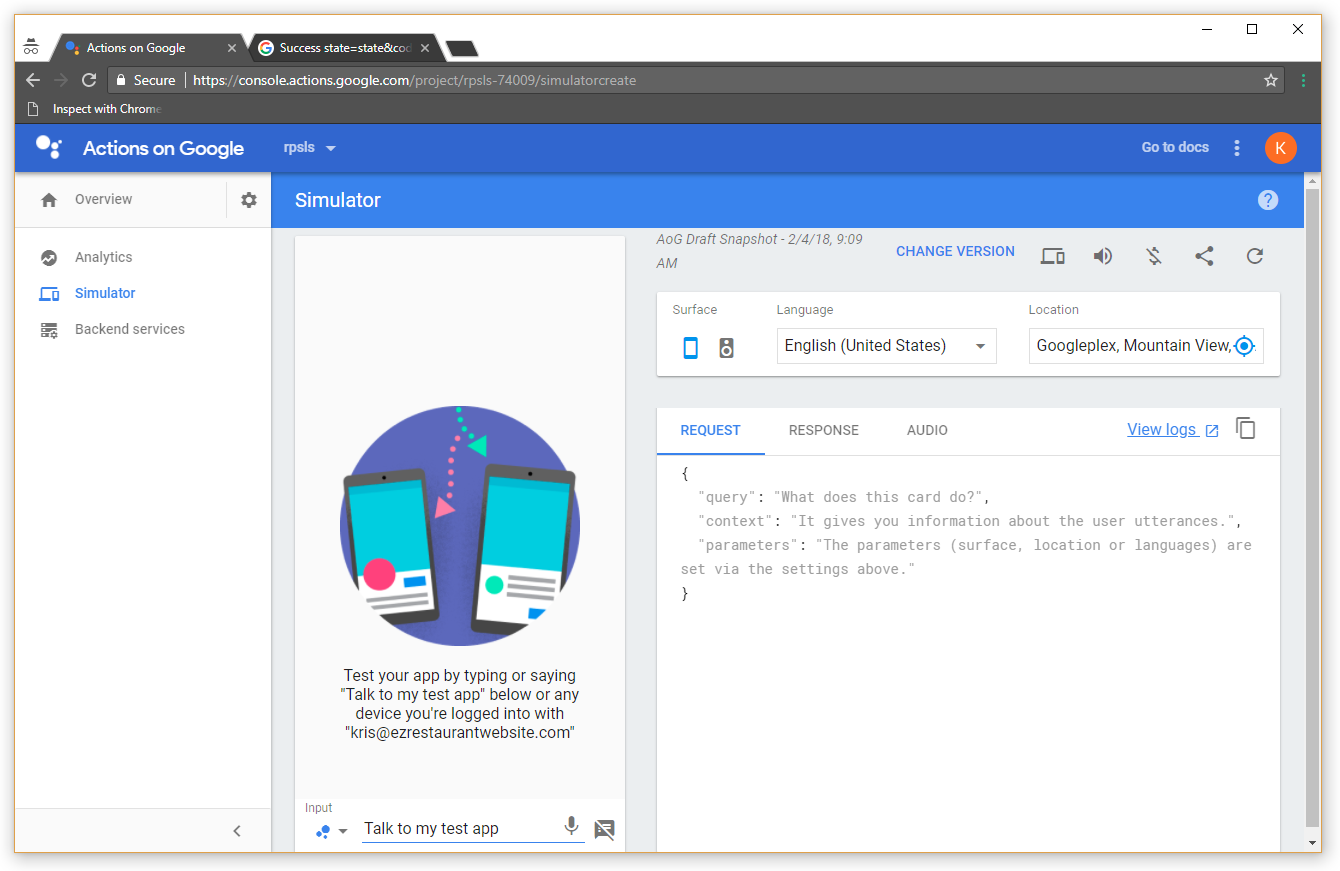
If everything worked, you should see and hear "Hey Ma, It Works!"
Next Steps
Now that it is working on the simulator, you can test it on your own Google Home. Note: The account you have logged in to your Google Home must be the account you are developing the App under. The same is true for testing on a device, and remember unless you fill out the App Information the name of the App is "My Test App".
Ok, now that we have an app up and working, we'll start learning more about the actual ActionsAppSDK in the next tutorial
and build out our program to actually play a game. While you are waiting, you might want to start messing around with the program we have created.
Perhaps asking more questions, or instead of using plain text use SSML (Speech Synthesis Markup Language ) to make more complex speech.
The methods available to the app object in the GoogleActionsSDK are documented here. Until next time, have fun!
Oh, and all the code for this project can be found on GitHub. This first article is is divided into 2 tags if you want to follow along,
first there is generating the JSON files, and finally the full code for this article is
https://github.com/kriserickson/google-actions-rpsls/tree/PART_1_STEP_2.
If you see any bugs, or have suggestions feel free to do so either in the comments below, or as an issue or pull request in the
GitHub repo.